Adding a New Site
From the main menu, click on “My Sites” and
you will see a list of sites that you have entered and below that you will see
the add website form. Enter your website into the URL, followed by the title.
Standard members can only add a certain number of sites, but premium members
can add unlimited websites to promote.
In the URL box type in the URL of your
website. The title is not important, people won’t see this. This is for you to keep track of different sites in your
account.
You should promote your capture page so you
can build a list. By building a list, you are promoting all your sites at
once, instead of just one at a time. People are tempted to promote just Neobux
or Clixsense because it “feels” like they can get referrals faster.
This will get short term results, but it is
bad long term. If someone is already in Neobux, then they will not sign up, and
you would have wasted your efforts. Remember, Neobux is very famous, so don’t expect too much if you are promoting
only that.
Assign credits
After gaining the credits, it is time to
distribute them. Based on the number of credits you have, put the credits you
wish to distribute in the box that says “Assign Credits” Once you click on the
Assign button, your site will become live. It will be visible when people go
surfing. Now all you have to do is wait
for people to sign up.
Advertise Your Capture Pages
Do you think registration pages will work?
Think about it for a second. When you are surfing on traffic exchanges, you are
looking to earn credits, and even if the website you are viewing catches your attention, you probably won’t
take action if a registration is required. When people are surfing, they will only look at
the site for 15 to 20 seconds. That is the timeframe in which we need to catch their attention.
Since we have only 15 to 20 seconds, a
registration page will not catch their attention. Neither will a sales page
(especially ones that require a lot of reading). A capture page is proven
to be the best way to get someone’s attentionwithin
that short timeframe, and get them to take action. All they have to do is fill
in an email address, which is quick and painless.
Adding Banners
If you have an eye catching banner you’d like
to use, then consider using banner advertising. Unlike the surfing option, only those who are
interested will click on your banner, so it is a good way to get targeted traffic to your capture pages.
From the main menu, click on My Banners
and you will see a list of all your banners and their statuses. Scroll down to where it says Add New Banner
If your banner is on your computer, then
upload it to EasyHits4U. If your banner is hosted on your website, simply type in the file’s URL into the box.
In the target URL box, make sure you
copy and paste your capture page’s URL.
Alt text is the text that appears when
someone moves their mouse pointer over the banner. It’s a way to convince the
person to click on it, so make it compelling, since you have only a split second to get their attention.
Check everything over, then click on Submit
Banner. Your banner will be reviewed by the EasyHits4U staff and will be
approved in 24 to 48 hours, so just wait patiently. Usually it is accepted within 24 hours.
 Once your banner is approved, it will appear
at random places in EasyHits4U. Sometimes it might show up in the member’s
area, or it can show up in the surf bar (during surfing). What’s good about
banner ads is that you can use split testing to see which one is the best one
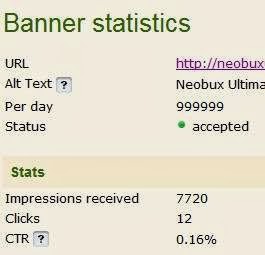
to use. Click on the stats link to be taken to the
next screen.
Each time your banner appears on the website,
it is an impression. The CTR is the number of clicks divided by the number of
impressions.
So if you assign 100 impressions to your
banner that receives 1 click, your CTR is 1%. The CTR is always less than 1%,
so don’t be surprised. You are trying to optimize this number so you make use
of your impressions.
If you have 2 banners that are live, you can
compare their stats and see which one is best.


